In this blog post I’ll be showing how you can use Vue Js with ASP.NET CORE MVC.
This post is going to be very straightforward since we’re only going to use a newly created asp.net core project with the MVC architecture and create Vue Js instances as we need. We’re also going to see the basics of Vue JS such as conditional statements and data binding.
Starting
To start, let’s create a new project in visual studio. We’re going to go with a Asp.Net Core Web Application.
In this post I'm using dotnet 5.
Like you probably already know the MVC architecture uses models, views and controllers for separation of concerns. We’re going to be focusing on views and controllers since we don’t have an actual data base and we’re going to be using in memory lists to display information.
Now that we have our simple app let’s import the Vue JS CDN so we can start using it.
Vue JS CDN
Vue JS has really good documentation, in the area where they explain how to install Vue they have the official CDN.
In the moment of writing this blog post I’m using version 2.6.12 of Vue Js.
Im going to add the CDN link on the file named _Index.cshtml in the Views > Home folder.
I added it under the HTML the Project brings by default.
@{
    ViewData["Title"] = "Home Page";
}

<div class="text-center">
    <h1 class="display-4">Welcome</h1>
    <p>Learn about <a href="https://docs.microsoft.com/aspnet/core">building Web apps with ASP.NET Core</a>.</p>
    <div id="app">
        <h1 class="display-4">{{message}}</h1>
    </div>
</div>
<script src="https://cdn.jsdelivr.net/npm/vue@2.6.12/dist/vue.js"></script>
Now if debug our project and we go to the Network Tab of our browser we’ll see the Vue Js script being used.
Using Vue Js
Now we can start using Vue Js in our Index.cshtml.
Now we’re going to open up another script tag and let’s write a new Vue instance.
<script>
    let app = new Vue({
        el: '#app',
        data: {
            message: `Vue in the works!`
        }
    })
</script>
Now in our HTML we can use the message in our view instance. As you can see we wrote the message in the HTML using curly brackets around the word. This is because Vue uses template syntax to bind data and the most simple form of binding data is using the curly brackets or mustache syntax.
<div class="text-center">
    <h1 class="display-4">Welcome</h1>
    <p>Learn about <a href="https://docs.microsoft.com/aspnet/core">building Web apps with ASP.NET Core</a>.</p>
    <div id="app">
        <h1 class="display-4">{{message}}</h1>
    </div>
</div>
Now if we debug our project we’ll see our message from Vue being displayed.

Using data from the server
Now let’s use a ViewModel in which we’ll create a C# record (like a class) and were going to return it to the view Index.cshtml and then use it on Vue.
Let’s create a file in the Models directory and call it IndexViewModel.cs.

Now let’s create two records one will represent a User and the other will be the IndexViewModel which we’ll return to the View.
public record User
{
	public string Username { get; set; }
	public string Name { get; set; }
	public string LastName { get; set; }
}
public record IndexViewModel
{
	public User User { get; set; }

	public List<User> FriendList { get; set; }
}
Now let’s create a new user for our ViewModel and return it.
public IActionResult Index()
{
	var model = new IndexViewModel
	{
		User = new User
		{
			LastName = "Rivera",
			Name = "Genesis",
			Username = "genesisrrios"
		}
	};
	return View(model);
}
Before using our ViewModel we have to start by adding this line: @model IndexViewModel;
Now in our view instance let’s use the model to display data. To use the data we’ll reference our model in vue, in this case I created a User object and added three properties which have the values of our Model.
let app = new Vue({
	el: '#app',
	data: {
		user: {
			user_name: '@Model.User.Username',
			last_name: '@Model.User.LastName',
			name: '@Model.User.Name'
		}
	}
})
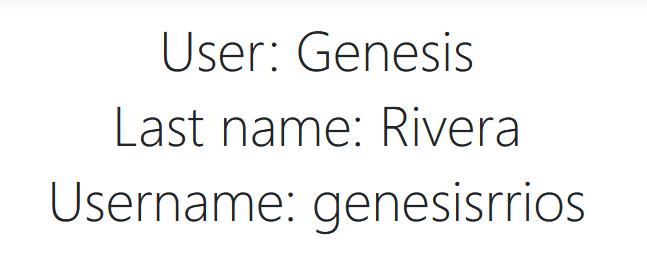
To use our user object we’ll use dot notation, which means the object name in this case user and a dot and the property name.
<div id="app">
	<h1 class="display-4">User: {{user.name}}</h1>
	<h2 class="display-4">Last name: {{user.last_name}}</h2>
	<h2 class="display-4">Username: {{user.user_name}}</h2>
</div>
Result:

Conditional statements and directives
Vue Js has directives that are basically HTML attributes which go inside HTML elements in the DOM and they all start with v- to indicate theyre Vue attributes.
v-if
For example if we wanted to show an element only if a certain condition is true we could use v-if or v-show.
Now if we add to our Vue instance a new list called friends_list and we create new elements in the DOM with a condition like this v-if=”friends_list.length > 0” this will only render if the list is not empty.
Javascript
data: {
	user: {
		user_name: '@Model.User.Username',
		last_name: '@Model.User.LastName',
		name: '@Model.User.Name'
	},
	friends_list: []
}
HTML
<div class="row py-lg-5" v-if="friends_list.length > 0">
	<div class="col-lg-6 col-md-8 mx-auto">
		<p>
		</p>
	</div>
</div>
v-for
Let’s go back to the controller and create a new list of friends inside the View Model.
Now our Index method looks like this.
public IActionResult Index()
{
	var model = new IndexViewModel
	{
		User = new User
		{
			LastName = "Rivera",
			Name = "Genesis",
			Username = "genesisrrios"
		},
		FriendList = new List<User>
		{
			new User
			{
				LastName = "Ford",
				Name = "Henry",
				Username = "henryford121"
			},
			new User
			{
				LastName = "Montgo",
				Name = "Suzzie",
				Username = "mongosus"
			},
			new User
			{
				LastName = "Rivera",
				Name = "Luis",
				Username = "starraiden"
			}
		}
	};
	return View(model);
}
To use our list we’re going to serialize it (Convert to Json) and then deserialize it (Convert to javascript objects). We’re going to use something called mounted in Vue js and it’s basically used to do something after the Vue instance is created but before the user actually see it. If you want to know more click here.
mounted: function () {
}
Using mounted I’m going to use the list in our model and assign it to a variable named friendList which will also serialize it. Then assign it to the reactive property called friends_list which is going to also de serialize the values.
let app = new Vue({
	el: '#app',
	data: {
		user: {
			username: '@Model.User.Username',
			lastName: '@Model.User.LastName',
			name: '@Model.User.Name'
		},
		friends_list: []
	},
	mounted: function () {
		let friendList = '@Html.Raw(Json.Serialize(Model.FriendList))';
		this.friends_list = JSON.parse(friendList);
	}
})
Before referencing reactive data we must use the keyword this followed by a dot in order to correctly reference a property because you might find yourself with an error otherwise.
Now let’s show the data in our HTML, we're going to change our HTML for:
<div class="text-center">
    <div id="app">
        <h1 class="display-4">User: {{user.name}}</h1>
        <h2 class="display-4">Last name: {{user.lastName}}</h2>
        <h2 class="display-4">Username: {{user.username}}</h2>
        <hr />
        <div v-if="friends_list.length > 0">
            <h2 class="display-4">Friends!</h2>
            <ul class="list-group list-group-flush" v-for="friend in friends_list">
                <li class="list-group-item">User: {{friend.name}}, Last Name {{friend.lastName}}, Username: {{friend.username}}</li>
            </ul>
        </div>
    </div>
</div>
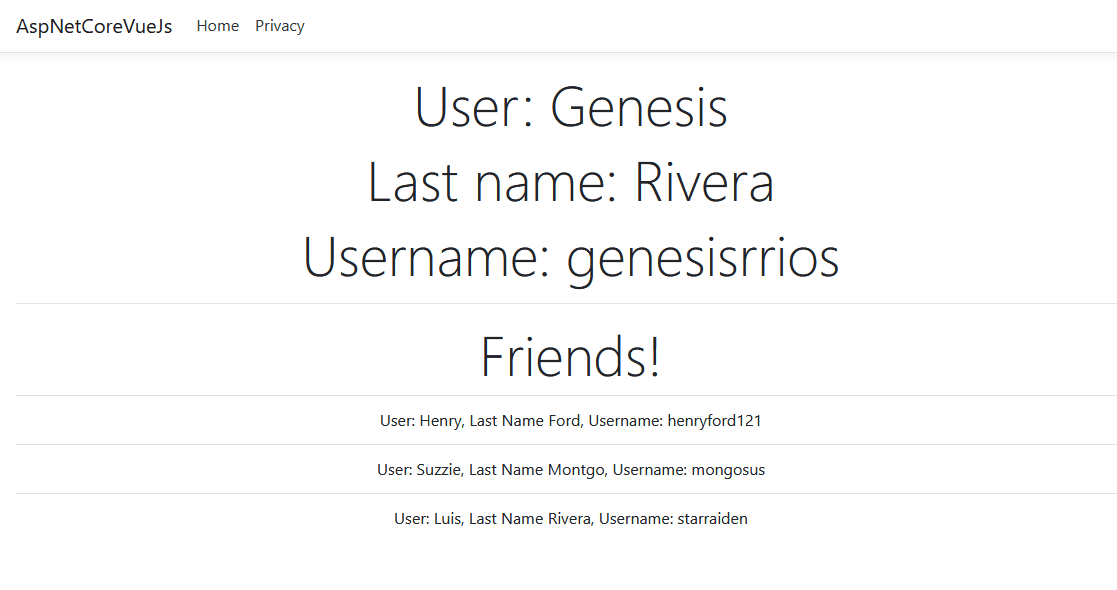
As you can see when we access elements using v-for we're iterating over the list created in our instance called friends_list and we created a variable called friend which is used to access the elements in our list that’s why we’re using friend.username etc.
Now if we debug our code we'll see:

Reactiveness
You probably noticed everything I did here could’ve been done with razor, the veauty (get it?) of Vue is in the reactiveness and being able to refresh data without refreshing the whole screen so let’s try that.
We’re going to use the Fetch api to do post requests and get requests on the server.
Since we don’t have a data base let’s move the list to the session temporary storage in Asp.net core. This is obviously not the way to do things but since I’m keeping things simple I’ll persist data that way. The important thing here is returning the list and adding ítems to it.
Let’s change our Index to use TempData.
public IActionResult Index()
{
	var friendsList = new List<User>
		{
			new User
			{
				LastName = "Ford",
				Name = "Henry",
				Username = "henryford121"
			},
			new User
			{
				LastName = "Montgo",
				Name = "Suzzie",
				Username = "mongosus"
			},
			new User
			{
				LastName = "Rivera",
				Name = "Luis",
				Username = "starraiden"
			}
	};
	TempData[TempDataFriendsList] = JsonConvert.SerializeObject(friendsList);
	var model = new IndexViewModel
	{
		User = new User
		{
			LastName = "Rivera",
			Name = "Genesis",
			Username = "genesisrrios"
		},
		FriendList = friendsList
	};
	return View(model);
}
Now let’s add two methods one is going to be a post request to add friends to the list and another one to return the list.
[HttpPost]
public bool InsertNewFriendInMemory([FromBody]User friend)
{
if (friend == default || !TempData.ContainsKey(TempDataFriendsList)) return false;
	var tempData = TempData[TempDataFriendsList];
	var deserializedData = JsonConvert.DeserializeObject<List<User>>((string)tempData);
	deserializedData.Add(friend);
	TempData[TempDataFriendsList] = JsonConvert.SerializeObject(deserializedData);
	return true;
}
public List<User> GetFriendsList()
{
	var tempData = TempData[TempDataFriendsList];
	TempData.Keep();
	var deserializedData = JsonConvert.DeserializeObject<List<User>>((string)tempData);
	return deserializedData;
}
Now we’re going to add some inputs to write the name, last name and username of our friends in order to display it under in the friends list. To do this we’re going to use two way data binding using v-model.
<hr />
<h1 class="display-4">Create new friend</h1>
<div class="input-group mb-3">
	<div class="input-group-prepend">
		<span class="input-group-text" id="basic-addon1"></span>
	</div>
	<input type="text" class="form-control" v-model="new_friend.name" placeholder="Name" aria-label="Name" aria-describedby="basic-addon1">
</div>
<div class="input-group mb-3">
	<div class="input-group-prepend">
		<span class="input-group-text" id="basic-addon1"></span>
	</div>
	<input type="text" class="form-control" v-model="new_friend.lastName" placeholder="Name" aria-label="Name" aria-describedby="basic-addon1">
</div>
<div class="input-group mb-3">
	<div class="input-group-prepend">
		<span class="input-group-text" id="basic-addon1"></span>
	</div>
	<input type="text" class="form-control" v-model="new_friend.userName" placeholder="Name" aria-label="Name" aria-describedby="basic-addon1">
</div>
<button type="button" class="btn btn-dark">Add user</button>
<hr />
In our Vue instance we’re going to create an object alike the user one we created previously called new_friend.
new_friend: {
	username: "",
	lastName: "",
	name: ""
},
This object will contain the values we write in our inputs.
Now we’re going to use fetch api to do a post request to the endpoint we created before and add the values to the friends list.
After the post request is done being executed and the promise is resolved we use the value from the method to check if it’s true and invoke the getFriendsList method which has the get request that assigns the new list to the friends list in our Vue instance.
getFriendsList: function () {
	let self = this;
	fetch('@Url.Action("GetFriendsList", "Home")')
		.then(response => response.json())
		.then(data => self.friends_list = data);
},
addFriend: function () {
	let self = this;
	fetch('@Url.Action("InsertNewFriendInMemory", "Home")', {
		method: 'POST',
		headers: {
			'Content-Type': 'application/json',
		},
		body: JSON.stringify(self.new_friend),
	})
	.then(response => response.json())
	.then(data => {
		if (data)
			self.getFriendsList();
	})
}
Let’s add a method to remove friends from the list. First in our HTML lets change the list so it’s clickable and add a removeFriend method which will be invoked when the user click a list item. Using v-on with the click event we can send values from our friend object created in the for loop.
The important part of this code is the list items having the v-on attribute which is used to listen to events in this case click event and when clicked it will trigger the removeFriend method which takes three parameters we get from our friend object created in the for loop.
HTML
<div v-if="friends_list.length > 0">
	<h2 class="display-4">Friends!</h2>
	<div class="list-group"  v-for="friend in friends_list">
		<a v-on:click="removeFriend(friend.username, friend.lastName, friend.name)" class="list-group-item list-group-item-action">
			User: {{friend.name}}, Last Name {{friend.lastName}}, Username: {{friend.username}}
		</a>
	</div>
</div>
Javascript
removeFriend: function (username, lastName, name) {
	let self = this;
	let deleteParameters = {
		username: username,
		lastName: lastName,
		name: name
	};
	fetch('@Url.Action("RemoveFriend", "Home")', {
		method: 'DELETE',
		headers: {
			'Content-Type': 'application/json'
		},
		body: JSON.stringify(deleteParameters)
	})
	.then(response => response.json())
	.then(data => {
		if (data)
			self.getFriendsList();
	})
}
C#
[HttpDelete]
public bool RemoveFriend([FromBody] User friend)
{
	if (friend == default || !TempData.ContainsKey(TempDataFriendsList)) return false;
	var tempData = TempData[TempDataFriendsList];
	var deserializedData = JsonConvert.DeserializeObject<List<User>>((string)tempData);
	deserializedData.Remove(friend);
	TempData[TempDataFriendsList] = JsonConvert.SerializeObject(deserializedData);
	return true;
}
You made it to the end!
That’s it for now. These basics cover something’s you need to know to get started with Vue. In the next couple of posts I’ll write about mixins, components and some other interesting stuff Vue Js has.